초기 설정은 다 되어있다는 전제 하에 flutter 프로젝트 firebase 코드 설정 부분 및 예제, 이슈 등을 정리해 보려고 한다.
Contents
Flutter FCM 사용 방법
Android FCM Setting
1. Firebase 사이트 > 등록한 프로젝트 > 프로젝트 설정 > 일반 > 하단에 내가 등록한 Android 앱 선택 > SDK 설정 및 구성 > google-services.json 다운로드 > Flutter 프로젝트\android\app 폴더에 넣기

2. Flutter 프로젝트\android\app\build.gradle 안에 다음과 같이 코드 작성
dependencies {
   ...
   implementation platform('com.google.firebase:firebase-bom:29.0.2')
   implementation 'com.google.firebase:firebase-analytics'
   implementation 'com.google.firebase:firebase-auth'
}
3. Flutter 프로젝트\android\app\src\main\AndroidManifest.xml 안에 다음과 같이 코드 작성
<manifest>
   <application>
      <meta-data
         android:name="firebase_messaging_auto_init_enabled"
         android:value="false" />
      <meta-data
         android:name="com.google.firebase.messaging.default_notification_icon"
         android:resource="@mipmap/ic_launcher" />
      <meta-data
         android:name="com.google.firebase.messaging.default_notification_channel_id"
         android:value="high_importance_channel" />
   </application>
</manifest>- firebase_messaging_auto_init_enabled - false: FCM 자동 초기화 사용 중지
- com.google.firebase.messaging.default_notification_icon : FCM icon 설정
- com.google.firebase.messaging.default_notification_channel_id : FCM 알림 채널 직접 생성하여 사용하기 위함 (생략 가능)
iOS FCM Setting
1. Xcode Firebase SDK 추가 ( 입력 주소 : https://github.com/firebase/firebase-ios-sdk )

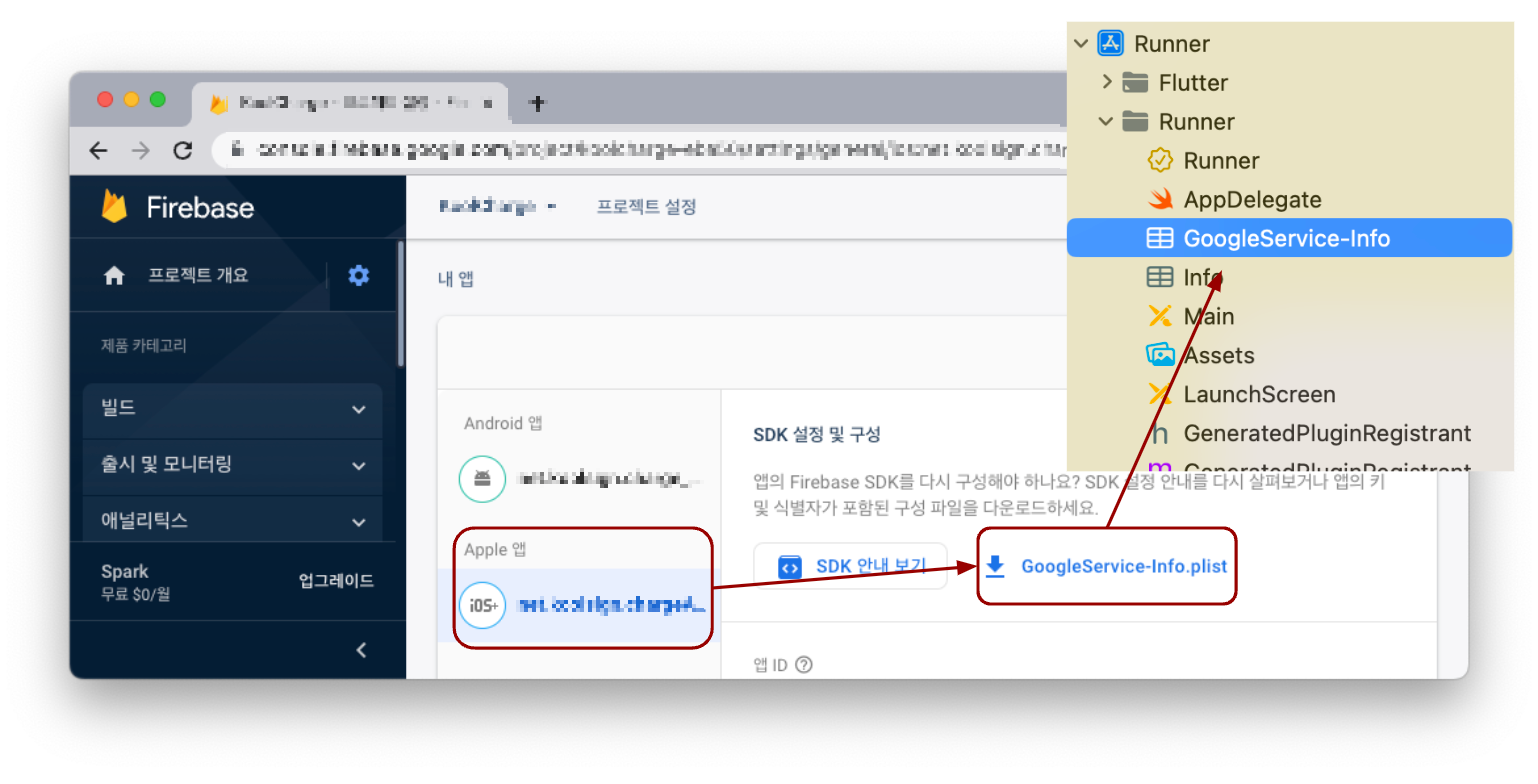
2. Firebase 사이트 > 등록한 프로젝트 > 프로젝트 설정 > 일반 > 하단에 내가 등록한 iOS 앱 선택 > SDK 설정 및 구성 > GoogleService-Info.plist 다운로드 > Flutter 프로젝트\ios\Runner 폴더에 넣기
3. Flutter 프로젝트\ios\Runner\Info.plist 안에 다음과 같이 코드 작성
<plist version="1.0">
<dict>
	<key>FirebaseAppDelegateProxyEnabled</key>
	<string>NO</string>
</dict>
</plist>
4. Flutter 프로젝트\ios\Runner\AppDelegate.swift 안에 다음과 같이 코드 작성
import Flutter

@UIApplicationMain
@objc class AppDelegate: FlutterAppDelegate {
   override func application(...) -> Bool {
      ...
      FirebaseApp.configure()
      ...
   }
}
Flutter Project FCM Setting
1. Flutter 프로젝트\pubspec.yaml 안에 다음과 같이 코드 작성
dependencies:
   flutter:
      sdk: flutter

   firebase_core: 1.21.0
   firebase_messaging: ^11.4.1
   firebase_auth: ^3.5.0
   firebase_core_platform_interface: 4.5.0
2. Flutter 프로젝트\lib\main.dart 안에 다음과 같이 코드 작성
void main() async {
   WidgetsFlutterBinding.ensureInitialized();
   await Firebase.initializeApp();

   runApp(MyApp());
}
Flutter FCM Basic Setting
* FirebaseMessaging 클래스의 instance를 전역 변수로 선언
final FirebaseMessaging _firebaseMessaging = FirebaseMessaging.instance;
1. FirebaseMessaging 토큰 가져오기
void getToken() async {
   await _firebaseMessaging.getToken().then((String? token) async {
      logI("$runtimeType", "FirebaseMessaging token : $token");
   });
}
2. FCM 알림 권한 설정
void _requestPermission() async {
   try {
      await _firebaseMessaging.requestPermission(
         alert: true,
         announcement: true,
         badge: true,
         carPlay: true,
         criticalAlert: true,
         provisional: true,
         sound: true,
      );

      await _firebaseMessaging.setForegroundNotificationPresentationOptions(alert: true, badge: true, sound: true);
   } catch (_) { }
}
3. FCM 알림 권한 가져오기
Future<bool> getNotificationSetting() async {
   NotificationSettings result = await _firebaseMessaging.getNotificationSettings();

   if (result.authorizationStatus == AuthorizationStatus.authorized || result.authorizationStatus == AuthorizationStatus.provisional) {
      return true;
   }

   return false;
}
4. FCM Listen 함수 구현
void listenFirebaseMessaging() async {
   const AndroidNotificationChannel channel = AndroidNotificationChannel('high_importance_channel', 'High Importance Notifications', importance: Importance.max);
   final FlutterLocalNotificationsPlugin flutterLocalNotificationsPlugin = FlutterLocalNotificationsPlugin();

   if (Platform.isAndroid)
      await flutterLocalNotificationsPlugin.resolvePlatformSpecificImplementation<AndroidFlutterLocalNotificationsPlugin>()?.createNotificationChannel(channel);

   await flutterLocalNotificationsPlugin.initialize(
      InitializationSettings(android: AndroidInitializationSettings('@mipmap/ic_launcher'), iOS: IOSInitializationSettings()),
   );

   FirebaseMessaging.onMessage.listen((RemoteMessage message) async {
      //
   });

   FirebaseMessaging.onMessageOpenedApp.listen((message) async {
      //
   });
}- AndroidNotificationChannel ID는 Flutter 프로젝트\android\app\src\main\AndroidManifest.xml에 설정했던 com.google.firebase.messaging.default_notification_channel_id 와 동일해야 함
Flutter FCM Background Setting
1. Flutter 프로젝트\lib\main.dart 안에 다음과 같이 코드 작성
void main() async {
   ...
   FirebaseMessaging.onBackgroundMessage(_firebaseMessagingBackgroundHandler);
   ...
}
2. Flutter 프로젝트\lib\main.dart 안에 다음과 같이 코드 작성
@pragma('vm:entry-point') // 릴리즈 시 백그라운드 핸들러 기능이 삭제되지 않도록 해주는 코드.
Future<void> _firebaseMessagingBackgroundHandler(RemoteMessage message) async {
   await Firebase.initializeApp(options: DefaultFirebaseOptions.currentPlatform);
   // insert your code
}

void main() async { ... }- Background Handler 함수는 main() 함수보다 상단에 위치해야 한다고 함
Flutter FCM Background Handler
1. shared_preferences 라이브러리 사용하여 전역 변수로 선언
final Future<SharedPreferences> prefs = SharedPreferences.getInstance();
2. FCM Background Handler 함수 안에 다음과 같이 코드 작성
Future<void> _firebaseMessagingBackgroundHandler(RemoteMessage message) async {
  await Firebase.initializeApp(options: DefaultFirebaseOptions.currentPlatform);

  final SharedPreferences _prefs = await SharedPreferences.getInstance();
  await _prefs.reload();

  if (message.notification != null && (message.notification!.title?.isNotEmpty ?? false)) {
    _prefs.setString('BackgroundMessage', message.notification!.title);
  }
}
3. 앱 실행 시 아래와 같은 함수 호출하여 백그라운드 메세지 처리
void backgroundNotificationCheck() async {
   final SharedPreferences _prefs = await prefs;
   await _prefs.reload();

   String? message = _prefs.getString('BackgroundMessage');
}
'프로그래밍 > Flutter-Dart' 카테고리의 다른 글
| [Flutter] record type (0) | 2024.01.25 |
|---|---|
| [Flutter] metadata (0) | 2024.01.25 |
| [Flutter] 지도 API 비교 및 사용 방법 (16) | 2023.01.08 |
| Flutter 필수 패키지 - Flutter에서 가장 많이 사용하는 패키지 (15) | 2023.01.06 |
| 플러터(Flutter)와 리액트(React) 중 어떤 플랫폼이 좋을까? (8) | 2023.01.05 |

댓글