QR코드를 인식해서 앱이 설치되어 있으면 앱의 특정 페이지로, 설치되어있지 않으면 설치 페이지로 이동하기 위해 deep link에 대해 알아봤다. 제일 많이 사용하는 Firebase Dynamic link로 구현하려고 했지만, 2025년 8월 25일 부로 서비스가 종료된다고 해서 사용해도 나중가서 마이그레이션을 해야 하는 상황이 오면 또 이것저것 찾아보느라 시간 낭비할 것 같아서 Github를 이용하여 universal link, deep link를 구현해보았다. 다시 까먹지 않기 위해 포스팅을 쓴다.
Android deep link
project_name/android/app/src/main/AndroidManifest.xml
Github로 웹호스팅을 할거니까 host 속성 값으로 user_name.github.io 주소를 넣어줬다.
<manifest xmlns:android="http://schemas.android.com/apk/res/android"
    xmlns:tools="http://schemas.android.com/tools"
    ...>

    <application>
    	<activity
        	android:exported="true"
            ...>

            <tools:validation testUrl="https://xxxx.github.io" />

            <intent-filter android:autoVerify="true">
                <action android:name="android.intent.action.VIEW" />
                <category android:name="android.intent.category.DEFAULT" />
                <category android:name="android.intent.category.BROWSABLE" />

                <data android:scheme="https" />
                <data android:host="xxxx.github.io" />
                <data android:pathPrefix="/" />
            </intent-filter>
        </activity>
    </application>
</manifest>
assetlinks.json 파일 작성하기
[
    {
        "relation": [
            "delegate_permission/common.handle_all_urls"
        ],
        "target": {
            "namespace": "android_app",
            "package_name": "android_package_name",
            "sha256_cert_fingerprints": [
                "9C:...:45"
            ]
        }
    }
]
package_name 속성의 값으로는 AndroidManifest.xml 상단에 <manifest ... package="com.example.applink"> 와 같이 package 이름을 넣어주면 된다.
sha256_cert_fingerprints 속성의 값으로는 sha256 값을 넣어주면 되는데, 나는 테스트하느라 androiddebugkey를 사용하여 sha256을 구해줬다.
아래와 같이 터미널에 입력해주면 값이 나온다. (참고로 Mac용)
// debug
keytool -list -v -keystore ~/.android/debug.keystore -alias androiddebugkey -storepass android -keypass android

// release
keytool -exportcert -alias androiddebugkey -keystore <릴리즈용 키 스토어 파일 경로> -storepass android -keypass android | openssl sha1 -binary | openssl base64
ios universal link
project_name/ios/Runner/Info.plist

위 그림과 같이 Key에 FlutterDeepLinkingEnabled 넣어주고 Type은 Boolean, Value는 YES를 입력해준다.
Xcode말고 코드로 입력해주고 싶으면 아래와 같이 작성해주면 된다.
<plist version="1.0">
<dict>
	<key>FlutterDeepLinkingEnabled</key>
	<true/>
    ...
</dict>
</plist>
project_name/ios/Runner/Runner.entitlements
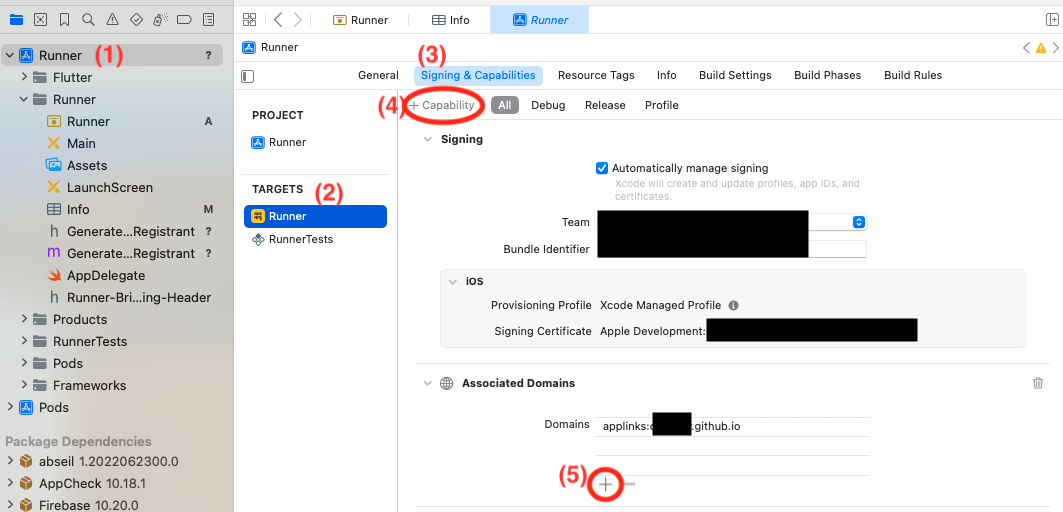
(1) Runner 클릭
(2) TARGETS - Runner 클릭
(3) Signing & Capabilities 클릭
(4) +Capability 클릭 후 Associated Domains 추가
(5) + 클릭 후 applinks:xxxx.github.io 입력
또 Xcode로 안하고 코드로 작성하고 싶으면 아래와 같이 해주면 된다.
<?xml version="1.0" encoding="UTF-8"?>
<!DOCTYPE plist PUBLIC "-//Apple//DTD PLIST 1.0//EN" "http://www.apple.com/DTDs/PropertyList-1.0.dtd">
<plist version="1.0">
<dict>
	<key>com.apple.developer.associated-domains</key>
	<array>
		<string>applinks:xxxx.github.io</string>
	</array>
</dict>
</plist>
apple-app-site-association 파일 작성하기
{
    "applinks": {
        "apps": [],
        "details": [
            {
                "appID": "2KG2XSW87X.com.example.applink",
                "paths": [
                    "*"
                ]
            }
        ]
    }
}
appID는 <Team ID>.<Bundle Identifier> 형식으로 입력을 해줘야 한다.
Team ID는 https://developer.apple.com/account 에서 멤버십 세부사항쪽에 나와있다.
Bundle Identifier는 project_name/ios/Runner/Info.plist에서 CFBundleURLName 키의 값을 넣어주면 된다.
Github 작업
이제 코드에서 해줘야 할 작업은 끝이 났고, Github 웹호스팅을 해보려고 한다.
Github Repository 생성
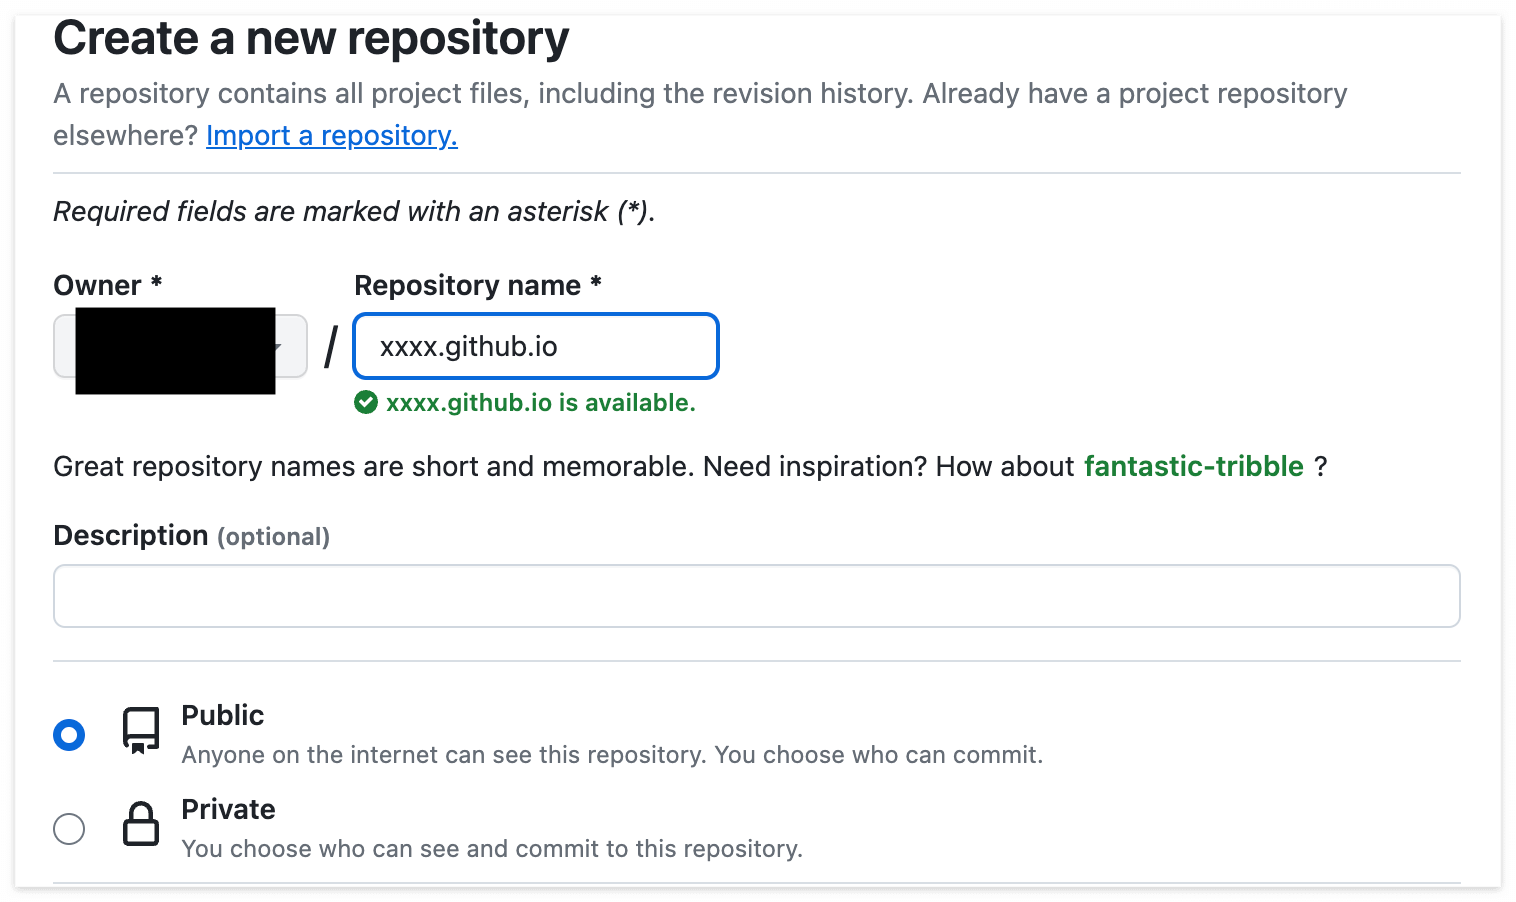
repository 이름은 user_name.github.io 형식으로 입력해줘야 한다. 그리고 꼭 Public에 체크해줘야 한다.
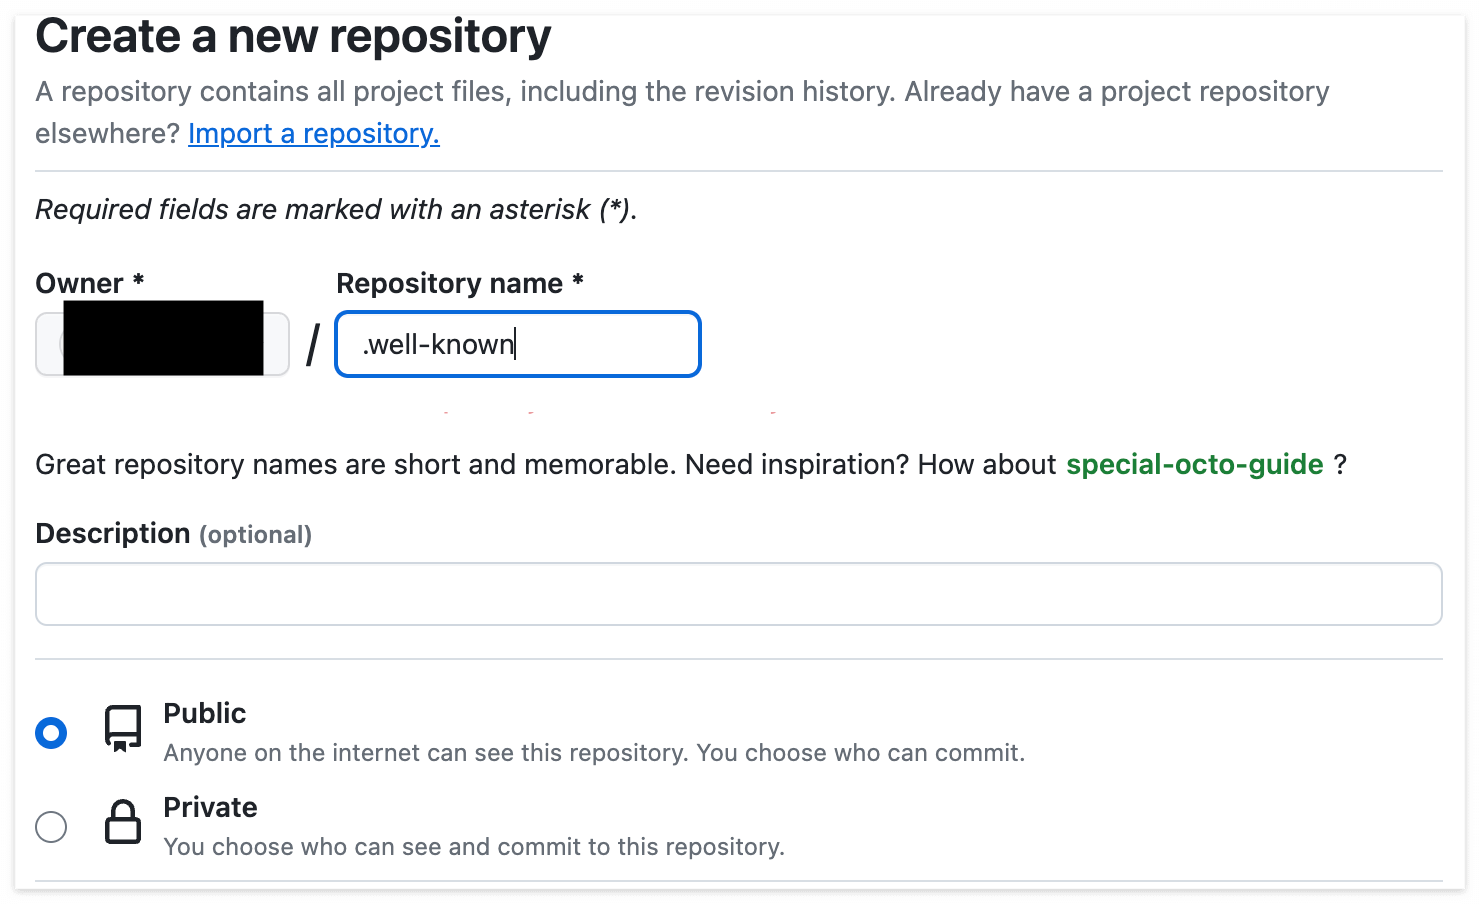
생성했으면 다른 repository를 하나 더 생성해주자. 이름은 .well-known으로 해주면 된다. 이것도 Public 체크 필수
xxxx.github.io/index.html 추가
<!DOCTYPE html>
<html>
<head>
    <title>Your Website Title</title>
    <meta name="viewport" content="width=device-width, initial-scale=1">
    <script type="text/javascript">
        window.onload = function() {
            var visitTime = (new Date()).getTime();

            var isAndroid = /android/i.test(navigator.userAgent);
            var isiOS = /iPad|iPhone|iPod/.test(navigator.userAgent) && !window.MSStream;
            if (isAndroid) {
                location.href = "https://play.google.com/store/apps/details?id=com.example.applink";
            } else if (isiOS) {
                location.href = "https://apps.apple.com/app/id0000000000";
            }
        }
    </script>
</head>
<body>
    <h1>AppLink Test</h1>
    <p>This is an example of a website that redirects users to the YouTube app's page on the App Store or Play Store, depending on their device.</p>
</body>
</html>
앱 설치 유무에 따라 android는 해당 구글 플레이 앱 url로, ios는 해당 앱 스토어 앱 url로 이동하도록 하는 javascrip 코드를 포함해준다.
여기서 만일 ios safari에서 앱이 설치가 되어 있지 않아 해당 앱스토어 url로 이동을 하지 못하고 "주소가 유효하지 않기 때문에 ..." 라는 팝업이 뜬다면 app store scheme url로 변경해주면 될 것이다.
https://apps.apple.com/app/id >> itms-apps://itunes.apple.com/app/id
Setting > Github Pages
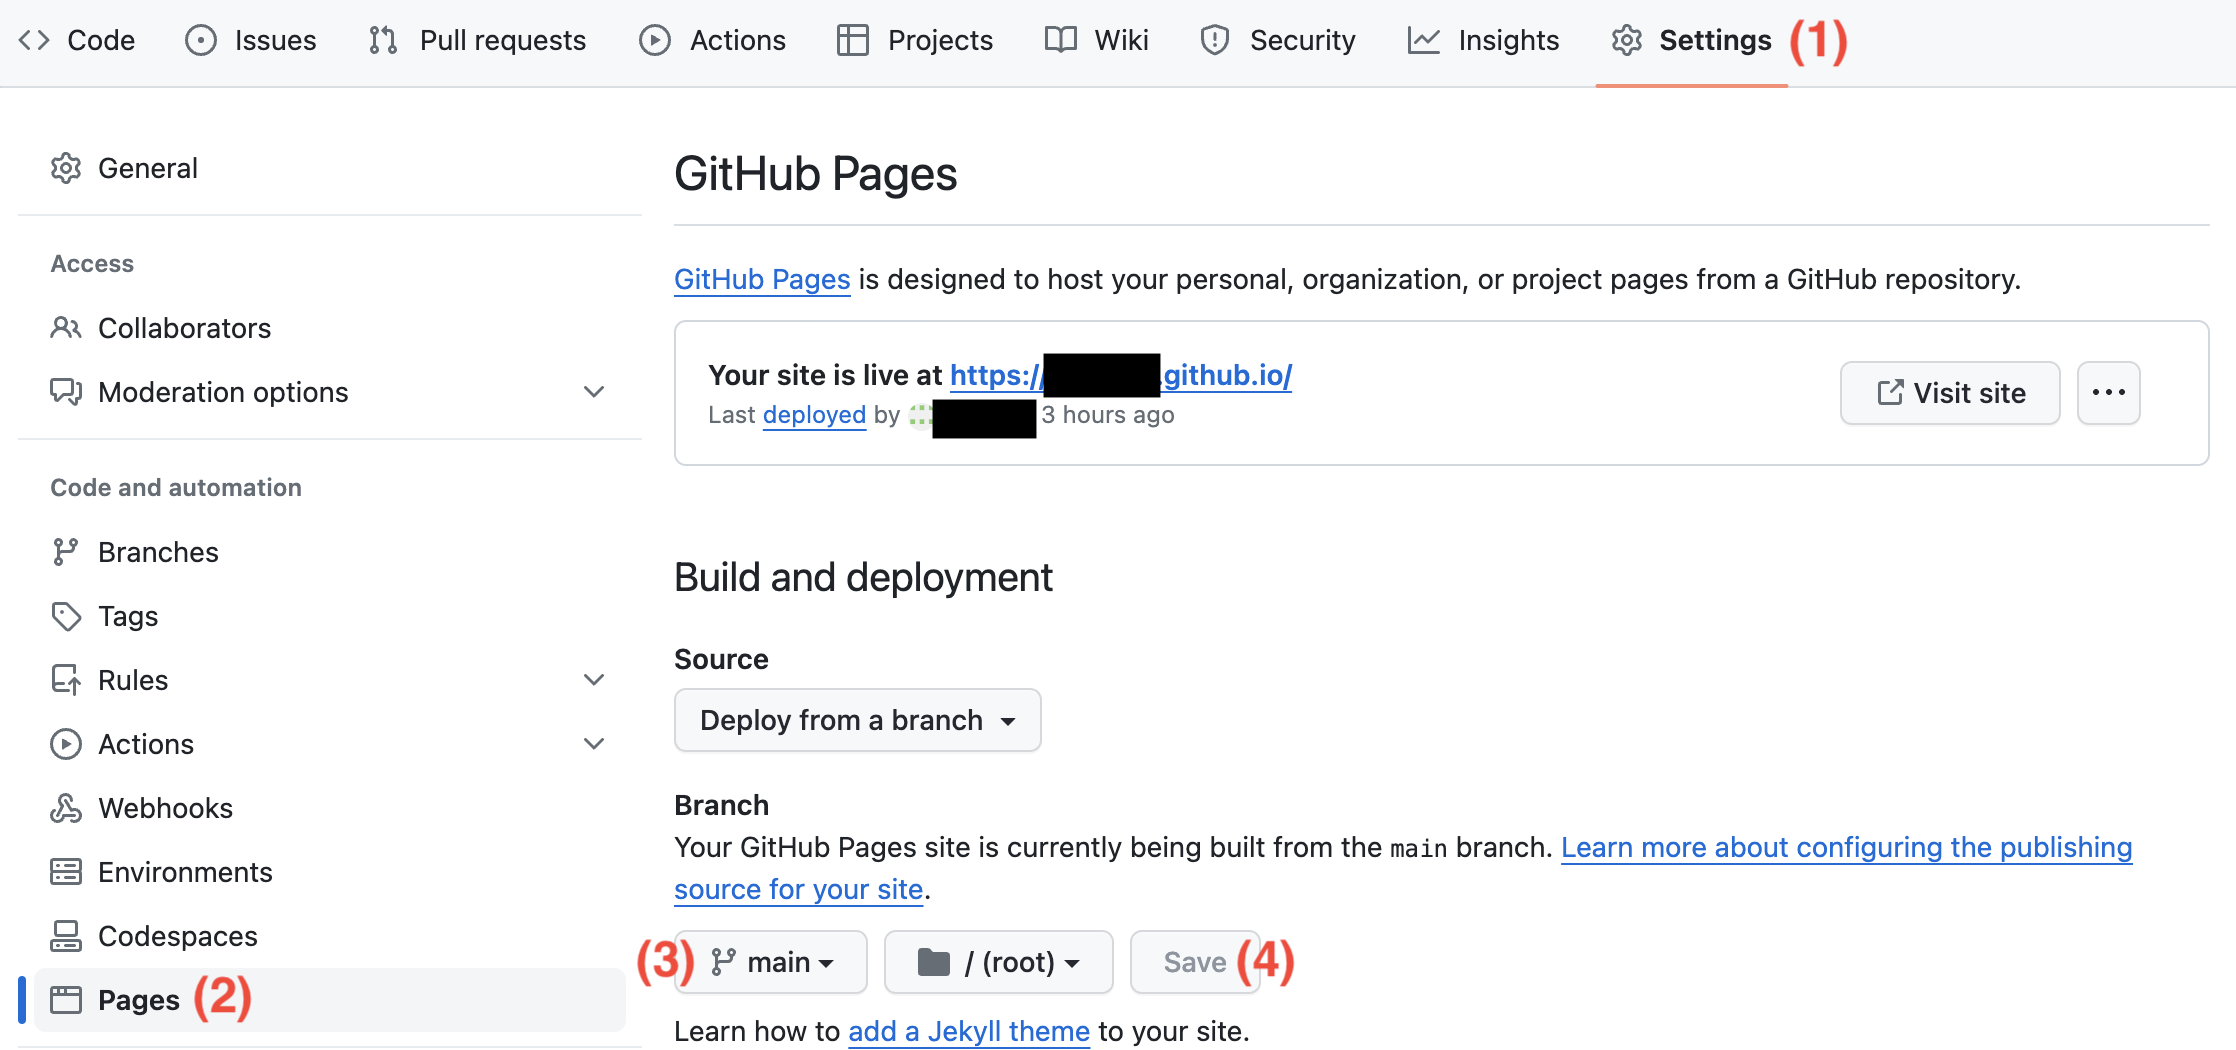
(1) 상단 Settings 클릭
(2) 왼쪽 중간에 Pages 클릭
(3) main branch 선택
(4) Save 클릭
위 과정을 거치면 https://xxxx.github.io url로 접속이 가능하다.
.well-known/assetlinks.json 및 .well-known/apple-app-site-association 추가

.well-known repository에 위에서 작성했던 assetlinks.json 파일과 apple-app-site-association 파일을 추가해주자
여기서 주의할 점은 apple-app-site-association 파일은 확장자 없이 추가해줘야한다.
Setting > Github Pages
위에서 xxxx.github.io repository 에서 설정해줬던 것처럼 해주면 된다. 생략!
그리고 검색창에 https://xxxx.github.io/.well-known/assetlinks.json과 https://xxxx.github.io/.well-known/apple-app-site-association 에 접속이 되는지 확인해줘야 한다. 404 에러만 안뜨면 됨!
app link 확인
앱을 설치하고 삭제해서 모바일 검색앱에서 https://xxxx.github.io url을 입력해서 테스트 해보거나, 터미널에서 명령어로 테스트해봐도 된다.
// android simulator or device
adb shell 'am start -a android.intent.action.VIEW -d https://xxxx.github.io'

// ios simulator
xcrun simctl openurl booted "https://xxxx.github.io"
참고로 ios simulator로 테스트할 경우, app store url로 이동하지 못하고 "주소가 유효하지 않기 때문에 ..." 라는 팝업창만 뜰 것이다. 실제 디바이스로 테스트하면 잘 이동된다!
uni_links 라이브러리 사용해보기
app link를 통해 앱에 접속했을 때 어떤 url을 통해서 들어왔는지, 또는 url에 파라미터가 추가되어있는 경우 내가 사용한 url을 알고 싶은 경우가 있을 것이다. uni_links 라이브러리를 사용해서 쉽게 알 수 있다.
pubspec.yaml
uni_links: ^0.5.1
main.dart
bool _initialUriIsHandled = false;
Uri? _initialUri;
Uri? _latestUri;
Object? _err;

@override
void initState() {
    super.initState();

    _handleIncomingLinks();
    _handleInitialUri();
}

void _handleIncomingLinks() {
    StreamSubscription _sub = uriLinkStream.listen((Uri? uri) {
        if (!mounted) return;

        print('got uri: $uri');
        setState(() {
            _latestUri = uri;
            _err = null;
        });
    }, onError: (Object err) {
        if (!mounted) return;

        print('got err: $err');
        setState(() {
            _latestUri = null;
            if (err is FormatException) {
                _err = err;
            } else {
            	_err = null;
            }
        });
    });
}

Future<void> _handleInitialUri() async {
    if (!_initialUriIsHandled) {
        _initialUriIsHandled = true;
        try {
            final uri = await getInitialUri();

            if (uri == null) {
            	print('no initial uri');
            } else {
            	print('got initial uri: $uri');
            }

            if (!mounted) return;

            setState(() => _initialUri = uri);
        } on PlatformException {
            print('falied to get initial uri');
        } on FormatException catch (err) {
            if (!mounted) return;

            print('malformed initial uri');
            setState(() => _err = err);
        }
    }
}
'프로그래밍 > Flutter-Dart' 카테고리의 다른 글
| [Flutter] 카카오톡 공유 (0) | 2024.04.04 |
|---|---|
| [Flutter] Validation Pattern (0) | 2024.01.29 |
| [Flutter] record type (0) | 2024.01.25 |
| [Flutter] metadata (0) | 2024.01.25 |
| [Flutter] Firebase Cloud Messaging 사용 방법 (5) | 2023.03.03 |

댓글